
Baggrund
Det kan være kompliceret og tidskrævende at administrere din PBX, især når du har flere PBX-tjenester. Med introduktionen af PBX-tabelvisningen muliggør vi masseredigering af PBX-tjenester på samme tid.
Nuværende løsning kræver, at du administrerer hver tjeneste individuelt, nu med ''PBX-Planlægger'' kan du masseredigere alle tjenester på samme tid og i en letanvendelig tabelvisning.
Fordele
- Lettere masseredigering af PBX-tjenester.
- Mere kontrol over dine PBX-tjenester, da du ikke behøver at administrere individuelle tjenester.
- Mulighed for at oprette PBX-tilstande.
Nøglefunktioner
- Vælg flere tjenester på samme tid.
- Tildel og opret PBX-tilstande.
- Opret og administrer begivenheder (tilbagevendende eller enkeltstående).
- Ryd kalendere.
Sådan guider du:
- Naviger til Admin-portalen.
-
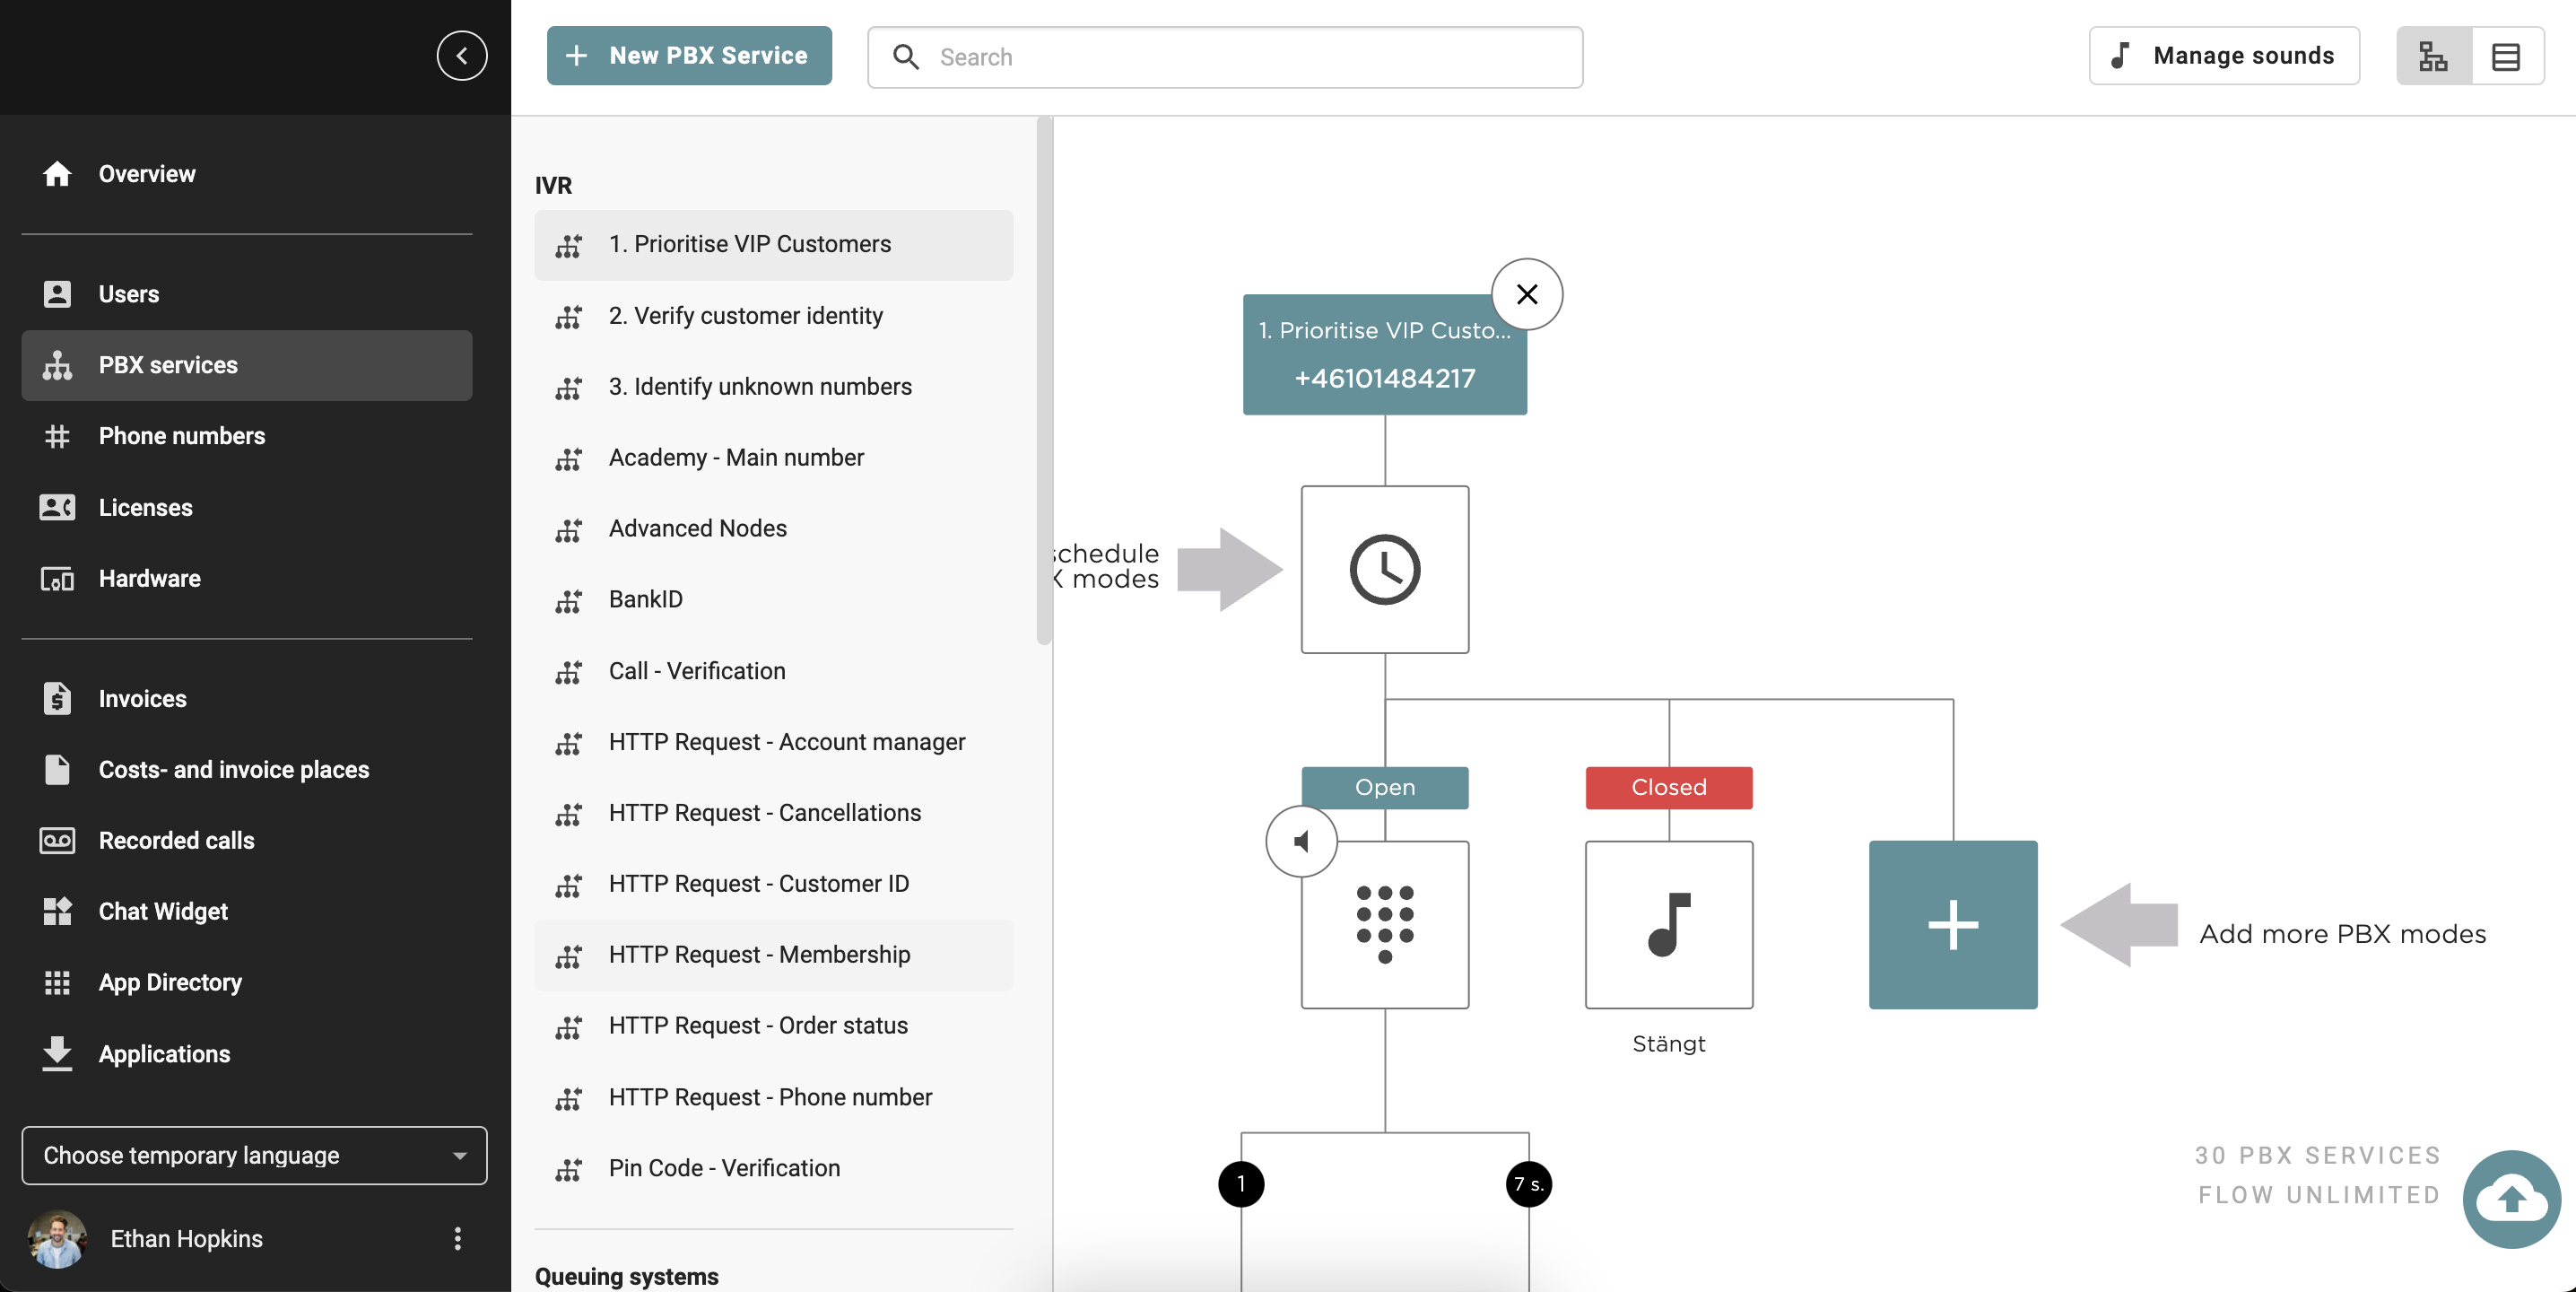
Klik på PBX Services i venstre sidepanel.
-
Klik på symbolet "Tabelvisning" i øverste højre hjørne ved siden af "Grafisk visning", hvor du kan se alle dine PBX-tjenester.

Navn og nummer
- Her kan du se alle dine PBX - tjenester såsom køsystemer, IVR'er, din fax og alle delte lokalnumre.
-
Hvis du markerer en eller flere tjenester, kan du med masseredigere funktionen "Tillad disse tjenester som visningsnummer", hvilket betyder at "Brugere, der har profiler, hvor dette nummer bruges som visningsnummer, vil få nulstillet deres visningsnummer, hvis dette nummer ikke er tilladt som displaynummer".

På artiklen Profiler kan du læse mere om, hvordan du administrerer nummervisning på forskellige profiler i Admin-portalen, i artiklen Valg af dit nummervisning kan du læse mere om, hvordan du vælger nummervisning i Desktop-appen.
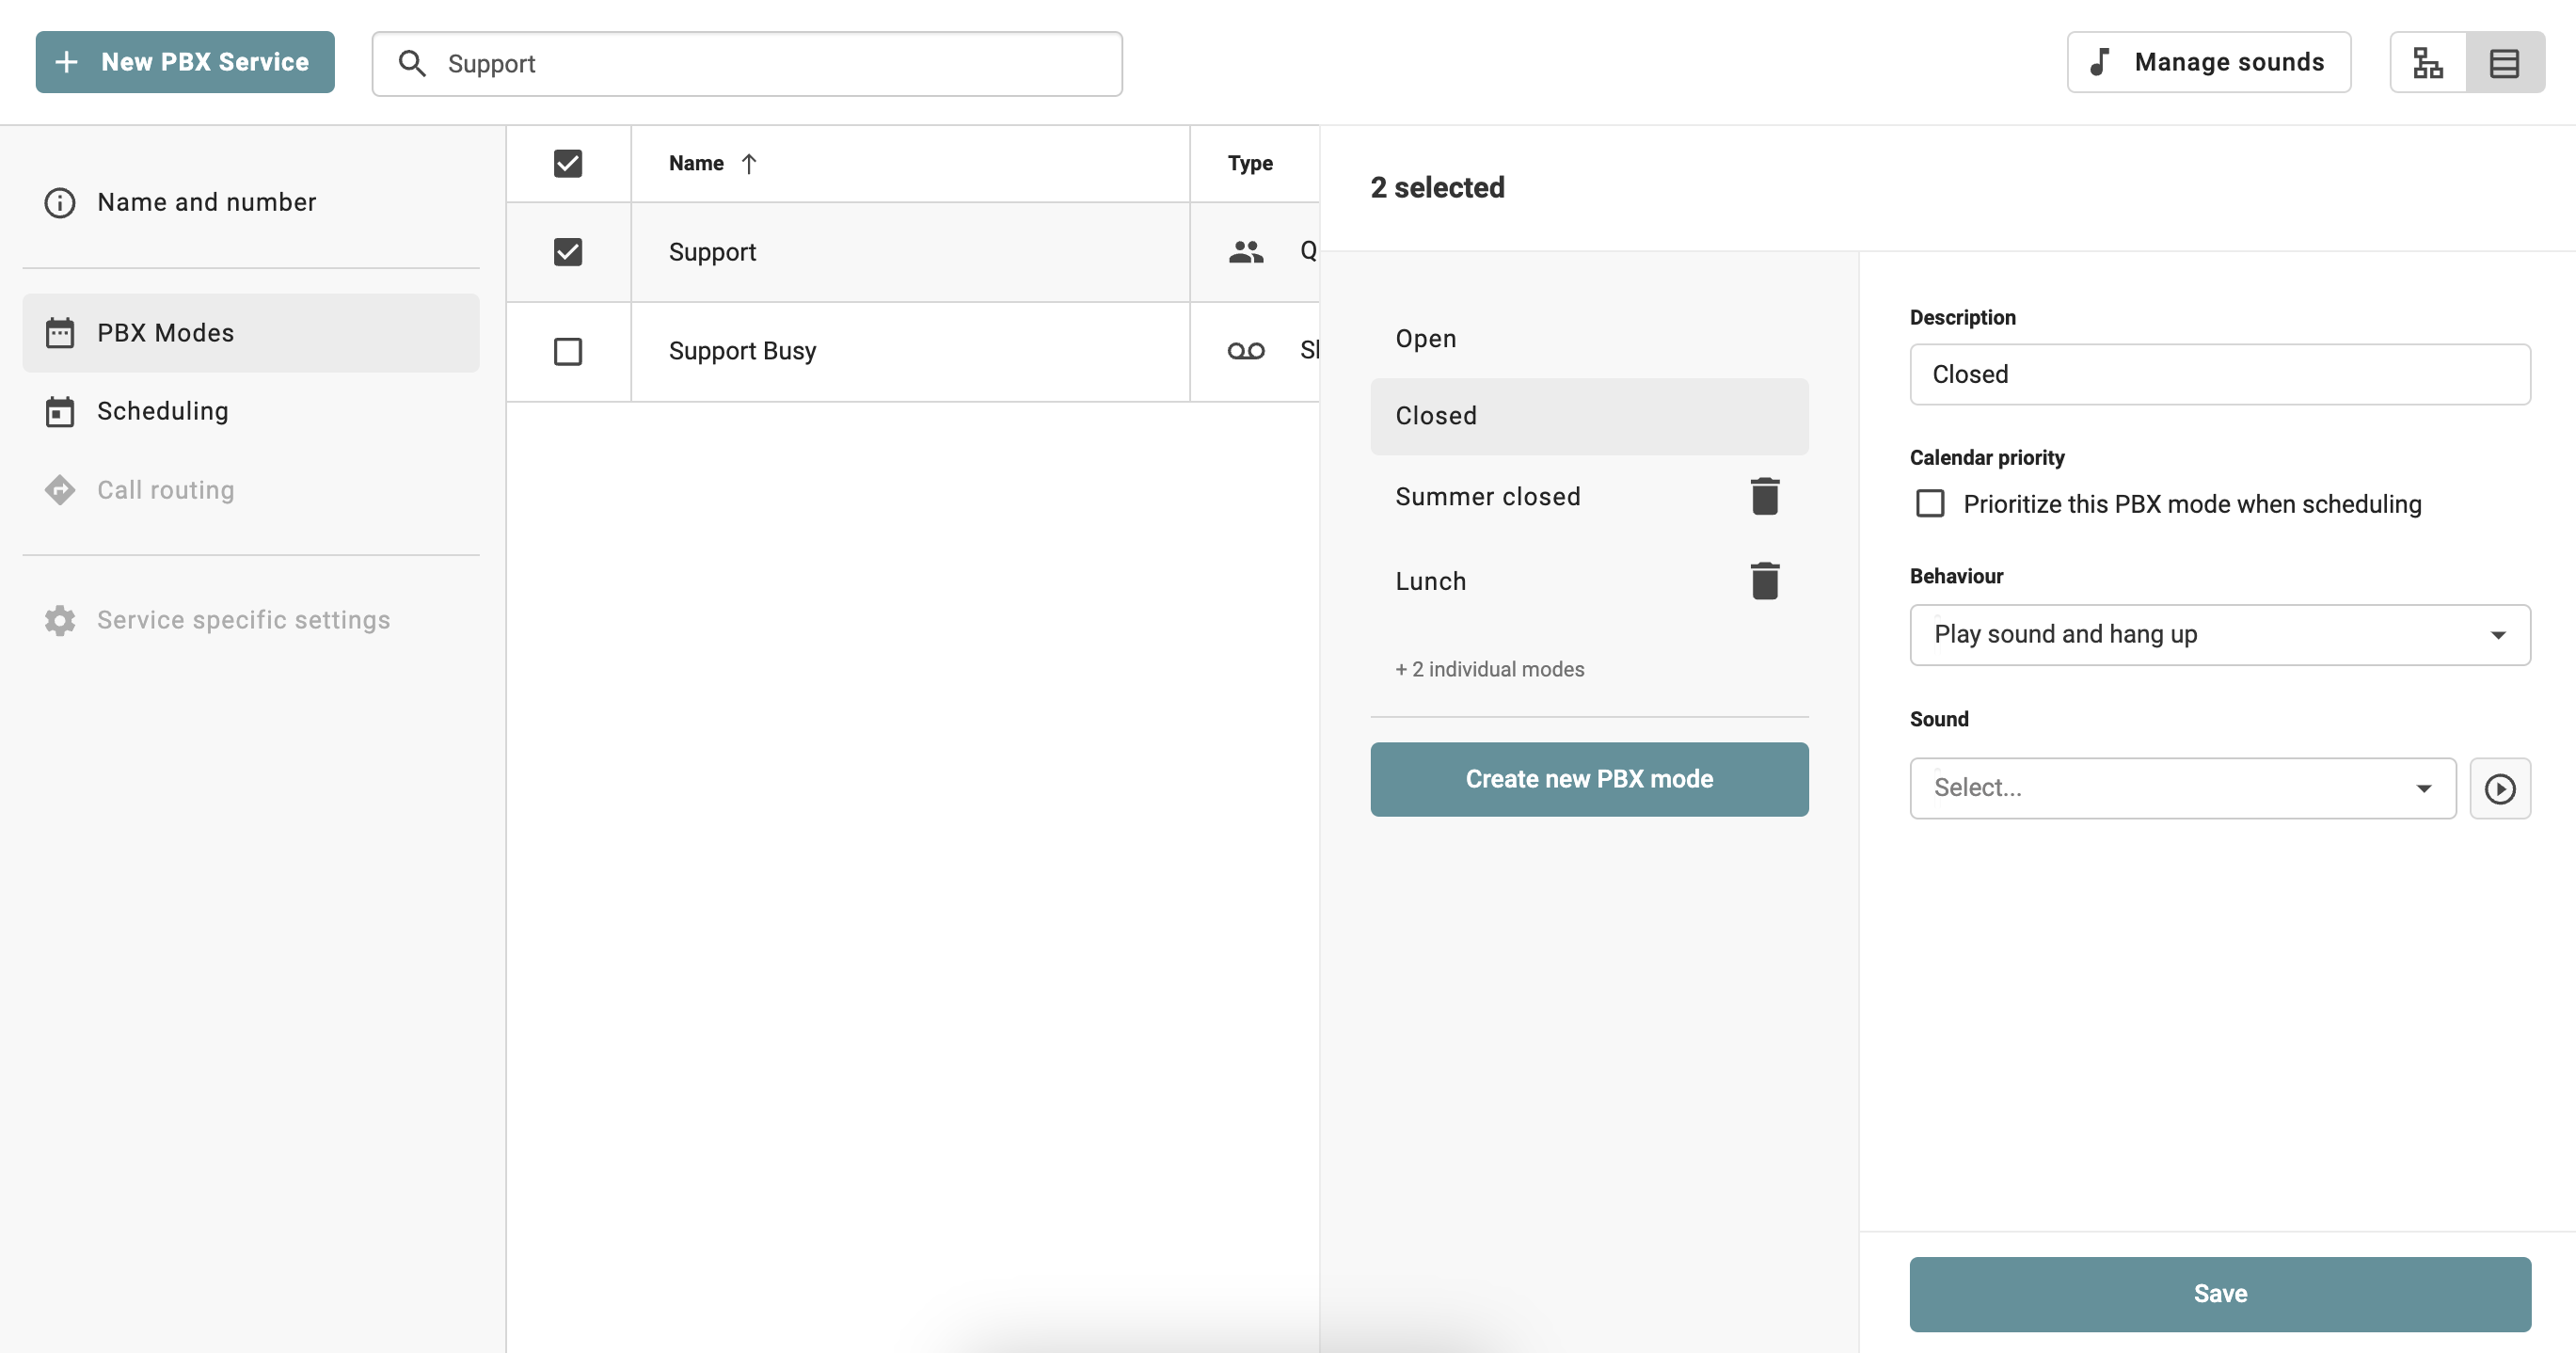
PBX-tilstande
- Under PBX-tilstande kan du ændre indstillinger i PBX-tilstand, f.eks. kalenderprioritet, adfærd og hvilken lyd, der skal afspilles. Du kan også oprette en ny PBX-tilstand.
-
Hvis du markerer en eller flere tjenester, kan du masseredigere PBX- tilstandsindstillinger eller oprette nye PBX-tilstande.
Servicespecifikke indstillinger
Ny tabelvisning til PBX-serviceindstillinger
PBX-serviceindstillinger kan nu administreres i tabelvisningen, og alle indstillinger kan redigeres på samme måde som i hovedvisningen (den grafiske visning) og under PBX-services.
Godt at vide:
- Funktionen er i øjeblikket ikke tilgængelig for underadministratorer (sub-admins).
- Masse-redigering er ikke tilgængelig i denne version. Administratorer vil se en besked o m dette.
Sådan finder du funktionen
- Gå til PBX-tjenester.
- Klik på Table View.
- Vælg derefter Service Specific Settings.
IVR'er
Her er et eksempel på, hvordan IVR-indstillinger vises i den nye tabelvisning.
Sådan ændrer du indstillinger i en IVR:
- Klik på boksen.
-
Brug tandhjulsikonet eller Indstillinger-knappen for at redigere den valgte udgang (output).

-
For at tilføje flere tastetryksvalg (touch tone-indstillinger) skal du klikke på et nummer i Keypad-menuen.

-
Vælg derefter, hvad der skal ske, når en der ringer vælger en tastetryksindstilling – for eksempel ved at trykke på 4.

-
Du kan tilføje en velkomstlyd, som afspilles, før den opkaldende kommer videre til køen for en bestemt tastaturmulighed. Du skal blot holde musen over linjen, der forbinder tastaturmuligheden med hændelsen, og klikke på den +-knap, der vises.

-
En ny boks vises – klik på den for at vælge den, og klik derefter på Indstillinger.

-
Vælg den lyd, der skal afspilles, før den opkaldende kommer videre til køen for den valgte tastaturmulighed.

-
Du kan vælge flere lyde – klik blot på Tilføj lyd.

-
Kan du ikke finde den rigtige lyd? Du kan altid optage nye lyde under Administrer lyde.

Alle indstillinger kan redigeres på samme måde som i hovedvisningen (den grafiske visning) og under PBX Services.
Køsystemer
Dette er et eksempel på, hvordan køindstillingerne vises i den nye tabelvisning. Alle indstillinger kan redigeres på samme måde som i hovedvisningen (grafisk visning) og PBX-tjenester.

Delte lokalnumre
Her er et eksempel på, hvordan indstillinger for delte lokalnumre vises i den nye tabelvisning. Alle indstillinger kan redigeres på samme måde som i hovedvisningen (den grafiske visning) og under PBX Services.

Fax-to-PDF
Her er et eksempel på, hvordan indstillinger for Fax-to-PDF vises i den nye tabelvisning. Alle indstillinger kan redigeres på samme måde som i hovedvisningen (den grafiske visning) og under PBX Services.

Planlægning
Under Planlægning kan du tilføje Brugerdefinerede begivenheder og Helligdage til dine PBX-tjenester. Hvis du markerer én eller flere tjenester, kan du masseopdatere planlægningen af begivenhederne.
Brugerdefineret begivenhed
- Klik på tilføj event.
- Vælg den PBX-tilstand, hvor du ønsker at masseopdatere.
- Vælg start- og slutdato for, hvornår denne PBX skal være aktiveret.
- Under Gentagelse kan du vælge, om begivenheden skal være en enkeltstående begivenhed eller gentage sig, for eksempel hver anden uge. Du kan også vælge en slutdato for begivenheden under Gentag indtil.

Helligdage
2. Vælg den PBX-tilstand, hvor du ønsker at masseopdatere.
3. Vælg Land.
4. Vælg én eller flere helligdage i det pågældende land.

5. Vælg start- og slutdato for, hvornår denne PBX skal være aktiveret.
6. Under Gentagelse kan du vælge, om begivenheden skal være en enkeltstående begivenhed eller gentage sig hvert år.

Opkaldsdirigering
- Gå til fanen Opkaldsdirigering i det venstre sidepanel.
- Vælg den specifikke PBX-tjeneste, hvor du vil tilføje kortvalget.
- Klik på Nyt kortvalg under Opkaldsdirigering.
- Indtast numrene.
- Når oplysningerne er udfyldt, skal du klikke på Opret nederst.
