
Meridix creates automatically some suggestions of reports you might find useful, per queue, user ID or IVR, which can be accessed directly from the front page, in Basic reports.
- Queues: Incoming - Answered - Unanswered - Redirected - (Avg) Queue
- User ID - presence: Incoming - Answered - Unanswered - (Avg) Call duration
- IVR: Handled calls.
By either clicking the category or the type of the report, you can access the report management page for each report.
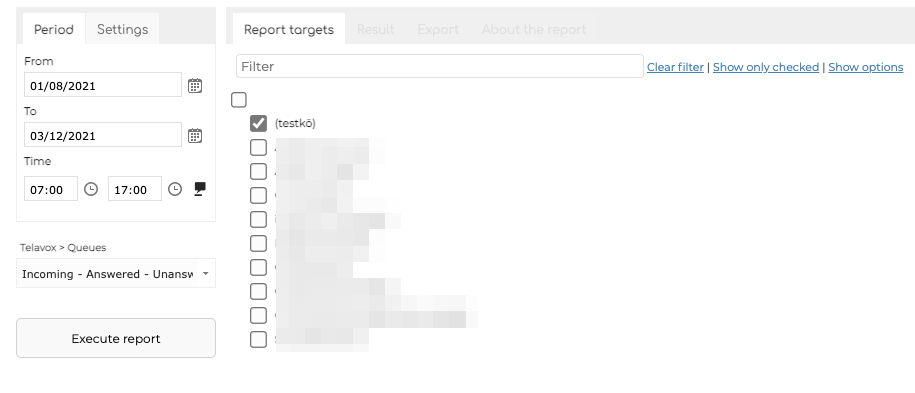
When creating a report, the two most important things is to remember to set the time range for the report, as well as the content range, which queues or users you want to include in the report. Select the time range from Period by adding the start and the end date and time. If you want to include only certain weekdays in your report, you can modify this under Settings. Under Telavox > Queues, you still have the chance to change the report type. In Report targets you select the users or the queues for the report. Once you have selected one or more parameters, Execute report button will show up, and by clicking it, you create the report.
The finished report will open in the page where you created it, in Result tab. Here you can see detailed statistics about the report. It is also possible to change the parameters of the report, and make the report be updated in real time - this is doable by selecting the box Auto update on the left hand side of the page. Otherwise the changes will apply only if you click the Execute report button.
If you want to export the report, you go to the tab Export and select how you wish to receive it - either through a direct download or through an email to your selected email address.
If you want to access your saved reports, you can do so by clicking Saved reports on the frontpage.
Advanced statistics
If you go to Advanced statistics in the landing page of Meridix, you get to set more detailed parameters for the statistics available.
- From-To is about setting the date range for your report
- Interval is about setting the time range for your report
-
Reportis for selecting if you want to show users or PBX in your report
- Here you can also use parameters under Report specific, where you can select the answering time or if you want to include on-hook waiting or not
-
Report targets is about selecting the exact users or PBXs for your report
When you have selected all the necessary information the report needs, a button Execute report will show up. By clicking it, you will create the report.